


Making Beer Made Easy
There are several ways to make beer. If you’ve never made beer before we encourage you to learn with the simplest style, starting with a pre-engineered canned extract kit beer. This will get you familiar with the boiling, cooling, fermenting, transferring, and bottling steps before moving on to the next level of brewing. We also encourage you to attend our free Sunday brewing classes.
1. Make a sanitizing solution using one cap full of Io-Star Sanitizer and 1 gallon of water. Add to your carboy and swish around, making sure all surfaces are wet, and let sit for at least 2 minutes before draining. It is important to keep any containers, siphoning tubes, bottles, caps, etc., clean and sanitized to create a successful batch of beer. Use the same sanitizing solution to soak anything that will come in contact with your beer. No rinsing is necessary using the Io-Star solution.
2. Heat 1 1/2 gallons of water in a stock pot to a boil. Remove pot from heat and add the canned Kit Beer and 3 lbs. of dry malt extract. We want to make sure that the extract doesn’t settle to the bottom of the pot and scorch. After mixing in the extract, bring to a boil and boil for 15 minutes. Watch the stock pot to avoid boil-overs. We boil to blend and sanitize our ingredients.
3. Use your funnel to add 2 gallons of cold water to your Fermenter. Pour in the sweet liquid (now called wort) you just boiled. Add more cold water, enough to make 5 gallons. Cover and let cool to 78º.
4. After the beer has cooled, you are ready to add the yeast. In a separate bowl, sprinkle a packet of yeast on 1/2 cup of warm water(again 78º). Let it sit for 15 minutes, covered, then add it to the cooled Fermenter. Cover the Fermenter with the stopper and shake to mix and aerate. Getting oxygen into solution will help provide the best environment for your yeast to do its work. Note: It is not necessary, but if you want to take a hydrometer reading, pour a sample from the fermenter into the hydrometer jar. Float the hydrometer in the liquid and record the specific gravity where the liquid intersects the scale. Later, when you are ready to bottle, you can take another reading to determine alcohol content.
- Formula For Finding Alcohol Levels
- Example
- Starting Gravity 1.045
- Subtract
- Finishing Gravity -1.010
- = Gravity .035
- Multiply by 131.25
- = Alcohol Percentage By Volume 4.6%
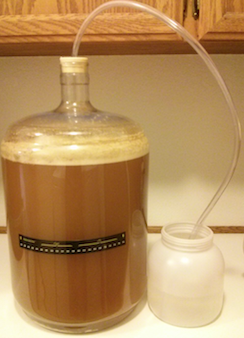
5. Seal the Fermenter using a stopper and the blow-off tube(3 ft. of flexible tubing) and let the foam blow off into a quart jar. Within the next 24 hours the yeast and beer will begin to ferment causing gas and foam to be expelled. When it slows, replace the blow-off tube with the airlock. Let the Fermenter sit at room temperature in a dark place. Fermentation will last anywhere from 2 to 10 days depending on your beer type. Note: Add a cup of water to the blow-off jar to create an airlock for the blow-off tube.
6. When the bubbles stop coming from the airlock, the fermentation is complete. After a week, the yeast will slowly settle to the bottom of the Fermenter. Congratulations, you've created Beer. You're ready to begin bottling. Siphon your new beer out of the Fermenter into the plastic bucket leaving behind the sediment at the bottom. Note: See the siphon instructions below.
7. Bring to boil 2 cups of water in a sauce pan with 3/4 cup of corn sugar. Stir this mixture gently into your new beer. Siphon your beer into clean sanitized bottles using the bottle filler. Note: Follow the siphon instructions as before, but add the bottle filler to the other end of your racking tube. Sanitize your caps with the Io-Star Sanitizer solution. Cap each bottle after filling. Now comes the hard part, letting your beer age. Store your bottles at room temperature for at least 2 weeks. This allows the beer to carbonate and the yeast to settle in the bottles.
8. Refrigerate your beer then drink it. Cheers.
Tips for making a better beer
1. Secondary Fermenter: To make a clearer beer, transfer your beer into a second carboy after one week and let age. More yeast will fall out and the beer will taste better with aging. Note: You must match the batch size to the fermenter to eliminate air space.
2. Avoid Oxidation: Beer can spoil if left exposed to air. Prevent spoilage by syphoning slowly, no splashing.
3. Cool Quickly: Pre-chill the water you add to the fermenter in the refrigerator overnight. Adding cold water will quickly drop the temperature for proper fermentation. (Don't refrigerate the carboy)Alternately, after you have boiled, set your pot in the sink in a bath of ice and water for 10 minutes or so to drop the temperature of your boiled wort. This will help insure that when you add your wort to your cold water up to the 5 gallon mark, you will be at the proper temperature.
How to Siphon
To siphon, place the vessel you are siphoning into, lower than the vessel you are siphoning from. Fit the 6 foot racking tube into the bent end of the racking cane. Fill the cane and tube with water and hold your finger over the end of the racking tube. Quickly put the end of the racking cane into the vessel you are siphoning from and the other end into the vessel you are siphoning into. Release your finger from the racking tube. This should get the siphon started. Note: Practice with water.
Visit the American Homebrewers Association website for more How To's and Videos!