


Fruit Wine Starter Kits
Starter Fruit Wine Making Kit $90 ($122 w/ Glass Carboy) Just Add Fruit
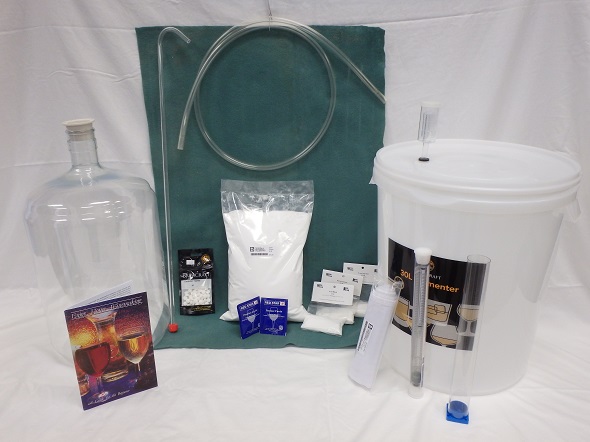
The Kit Includes:
1. 5 gal Fermenter (Plastic carboy). 2. 7.5 gal Fermenter. 3. Airlock. 4. Stopper. 5. Racking Cane. 6. 6' Racking Tube. 7. Straining Bag. 8. Hydrometer. 9. Beginner Book with Recipes. 10. 10 lbs of corn sugar. 11. Acid Blend. 12. Pectic Enzyme. 13. Yeast Nutrient. 14. Campden Tablets. 15. 2 packs of Wine Yeast. 16. Hydrometer Jar. 17. 4oz Star San
Making Wine Made Easy
Their are two basic wine types. The most common to home winemakers are "country wines" that I'll explain here. Country wines use blackberries, raspberries, plums, and just about every other fruit except wine grapes. The other wine style is of course, grape wines. By using traditional wine grapes the winemaker will crush, press, and ferment them into wine. These grapes are the perfect fruit for wine. They contain all the necessary sugar, water, acid content, nutrients, and flavor to make wine. These are the most common wines made by professional wineries and sold at the supermarket. With the right equipment, home winemakers can create these wines as well. But for now we will describe country wines because they are inexpensive and easy for beginners. They also come out surprisingly well. Here are the steps.
1. Cleaning: Sanitize your fermenting bucket. Use 1oz of Star San no rinse sanitizer to 5 gallons of water. Soak fermenter in sanitizing solution, no need to rinse foam. When you need it, you can prepare all your equipment using this method.
2. Mixing: Start by adding your cleaned fruit to the bucket. For this recipe we'll use 20 lbs of blackberries. Crush the fruit using a potato masher, baseball bat, or whatever is handy and easily cleaned. Add 10 lbs of corn sugar, 5 tsps each of yeast nutrient, acid blend, and pectic enzyme. Fill with water to within approximately 4 inches from the top(23L or 6 gal mark on the side of the bucket). Mix thoroughly. This gives you about 6 gals. of unfermented wine which is now referred to as "the must".
3. Hydrometer Readings: The hydrometer lets you know how your fermentation is progressing. It measures the density of the must. Sugars in your must create density. As the must ferments, the sugars turn to alcohol and change can be seen with the hydrometer. You can take a sample of the must and put it into the hydrometer jar or clear a space from the floating fruit in your fermenting bucket. Float the hydrometer. Note where the liquid intersects the hydrometer. You want a reading of about 11% on the potential alcohol scale or 1.080 on the gravity scale. If the reading is low you can add more sugar. One pound of sugar can raise the alcohol by 1%.
4. Sanitizing The Must: Before we add the wine yeast we want to insure that we kill any bacteria or natural yeast that may be living in our must. We do this by adding sulfites, specifically sulfur dioxide(Campden Tablets). Crush 5 Campden Tablets and add to the must. Stir well, mixing all ingredients. Cover the bucket with a linen cloth and let sit for 24 hours. As the sulfites do their job they dissipate and leave the must ready for the wine yeast. Although sulfites are found in almost all commercial wines some people object to them. Sulfites are not necessary for fermentation but they do help to prevent your wine from becoming vinegar or worse.
5. Pitching the Yeast: After the must is sanitized we are ready for yeast. Prepare the yeast by adding it to a cup of warm water, let sit for 15 mins., add to the fermenter, cover with the lid and attach the airlock. Fill the airlock half full of water.
6. Primary Fermenting: The wine should start fermenting in 12 to 24 hours. The fruit will float to the top of the bucket. Open the bucket and stir the fruit once a day for one week. Do not stir the bottom, just stir to keep the fruit moist. After one week, strain the fruit out of your wine with the nylon straining bag. Squeeze and wring out the bag into the bucket to get out as much juice as possible. Be sure to clean your hands well or use rubber gloves for straining.
7. Racking(transferring): Once the yeast has consumed the fermentable sugar, it falls into sediment in the bottom of the fermenter. You now begin a process of clearing the wine by siphoning and leaving the yeast behind. Use the racking cane and racking tube to siphon from the bucket into the 5 gal bottle. Attach the airlock and stopper.
8. Secondary Fermenting: Let the wine sit in the 5 gal bottle for 2 weeks. After 2 weeks the fermentation will have stopped and more yeast will settle to the bottom of the bottle. You are now ready to transfer again. It is best to have 2 bottles and syphon back and forth to clear your wine. If you don't have another bottle, siphon into the bucket, rinse and sanitize the bottle, then siphon back. Let it sit for 1 month and repeat the process again. Let it sit for another month. If yeast is still present, repeat the siphoning again. After the wine is clear and stable it is ready to bottle.
9. Bottling: 5 gals. of wine will use 25 bottles(750ml). The wine can be corked and aged for 3 months to 1 year. Screw cap wine bottles and jugs work as well. If the wine is dry(not sweet) it may be sweetened by adding Potassium Sorbate to stop any yeast from becoming active and adding sugar to taste.
Tips for a better wine:
1. Limit your wine's exposure to air. If after siphoning, you have less that 5 gallons of wine in your fermenter, top up the fermenter with pre-boiled water to eliminate the air space.
2. Get a second carboy for transferring. Less transferring means less air exposure and less wasted wine.
3. Make your wine clear faster with fining additives. The yeast and fruit pulp remaining in your wine will prevent it from becoming perfectly clear. You can use fining additives such as isinglass, polyclar, gelatin, sparkaloid, etc. to clear. Filtering units are also available.
4. Acid levels in wine can be adjusted. If your wine has too much of an acid bite, you can tame it with potassium carbonate. If your wine has too little acid it can taste flat, you can add more acid blend to taste.
5. Additional flavors. Oak barrels are used by professional and home wine makers to impart a woody character to wine. Try adding oak chips to get these same flavors.